Browan Pico Next
Registration and Configuration
If you have not done so already you will need to register your Gateway through your Developer or RAN Provider account using the steps below.
Prerequisite Registration Information
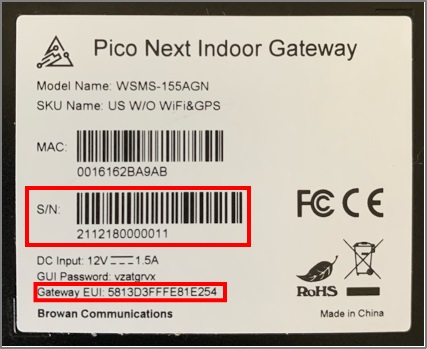
The Serial Number ('SN'), and 'Gateway EUI' values can be found on the label located on the back of the Browan Pico Next.
Registration on the Netmore network
Once the Manufacturer (Gateway) EUI and Gateway SN have been acquired, return to the Netmore Portal and complete Registration.
Note
Users with a free Developer Account can find supplemental information using the following link: Generic Developer Gateway Registration Users registered as RAN Providers can find supplemental information using the following link: Generic RAN Provider Gateway Registration
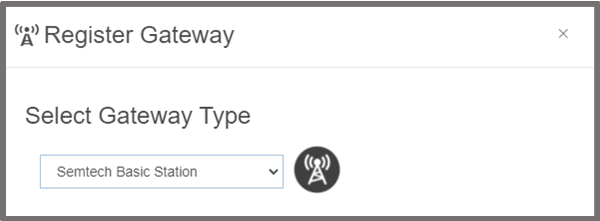
- Using any user account type with access to Gateway registration capabilities; when asked to Select Gateway Type during registration on the Netmore Portal, choose the
Semtech Basic Stationoption from the drop down menu.
- Enter the unique SN and Manufacturer EUI as required.
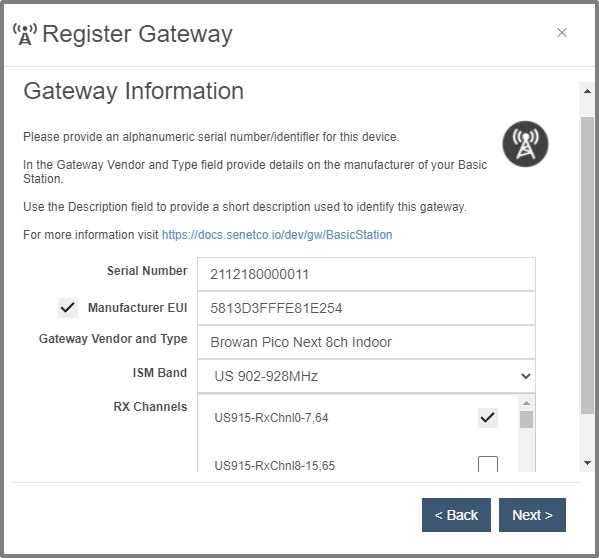
- Complete the registration process by filling in the remaining fields.
Note
The Browan Pico Next supports a maximum of 8 channels at any given time. During registration you will have a chance to select which sub-band of 8 RX Channels the Gateway should operate on to start. Tip: After registration is complete, you can use the Netmore Portal to reconfigure the RX Channel sub-band without the need to login to the Browan Configuration web interface (make sure to power cycle the Gateway after making any changes).
Browan Configuration Web Interface Initial Access Instructions
The Pico Next Gateway is configured by default to operate as a DHCP client. Once the Gateway's 'MAC' value is obtained from the back label and the Gateway is connected to a wired (Ethernet) network operating a DHCP server, a network administrator with access to the DHCP assignment table should be able to find the IP address of the Gateway if provided with the Gateway's MAC address.
Note
For more information, please refer to the Browan Pico Next User Guide
All users are required to obtain initial access via DHCP, in order to configure a a cellular network backhaul interface and/or configure the Gateway LoRaWAN Packet Forwarding to communicate with the Netmore Network Server.
Wired (Ethernet) Initial Access Instructions
- Ensure both antennas that shipped with the Pico Next are installed.
- Ensure Gateway's WAN port is connected via Ethernet cable to a network with operational DHCP Server.
- Power on Gateway using the included DC adapter.
- Contact a network administrator with the Gateway 'MAC' value and request the corresponding IP address.
- Using the corresponding IP address, access the Gateway in a web browser (Chrome is recommended).
A summary of the default characteristics are provided below:
| Interface | Default Static IP | Default Username | Default Password |
|---|---|---|---|
| Wired (Ethernet) | DHCP Client | admin | unique 'GUI Password' value listed on Gateway label |
After logging in, as a security precaution it's strongly recommended to change the default password.
WAN Backhaul Configuration
In addition to the Ethernet backhaul, the Gateway can also be configured for cellular backhaul operation.
For customers wishing to continue using Ethernet DHCP Client as the preferred backhaul configuration, no action is required.
Note
For other backhaul configurations and more information, please refer to the Browan Downloads page
Configuring LoRaWAN Packet Forwarder as a Semtech Basic Station
- Verify the Gateway has a valid network backhaul and the Registration process is completed in the Netmore Portal.
- Return to the Browan Configuration web interface to configure the Gateway packet forwarding software.
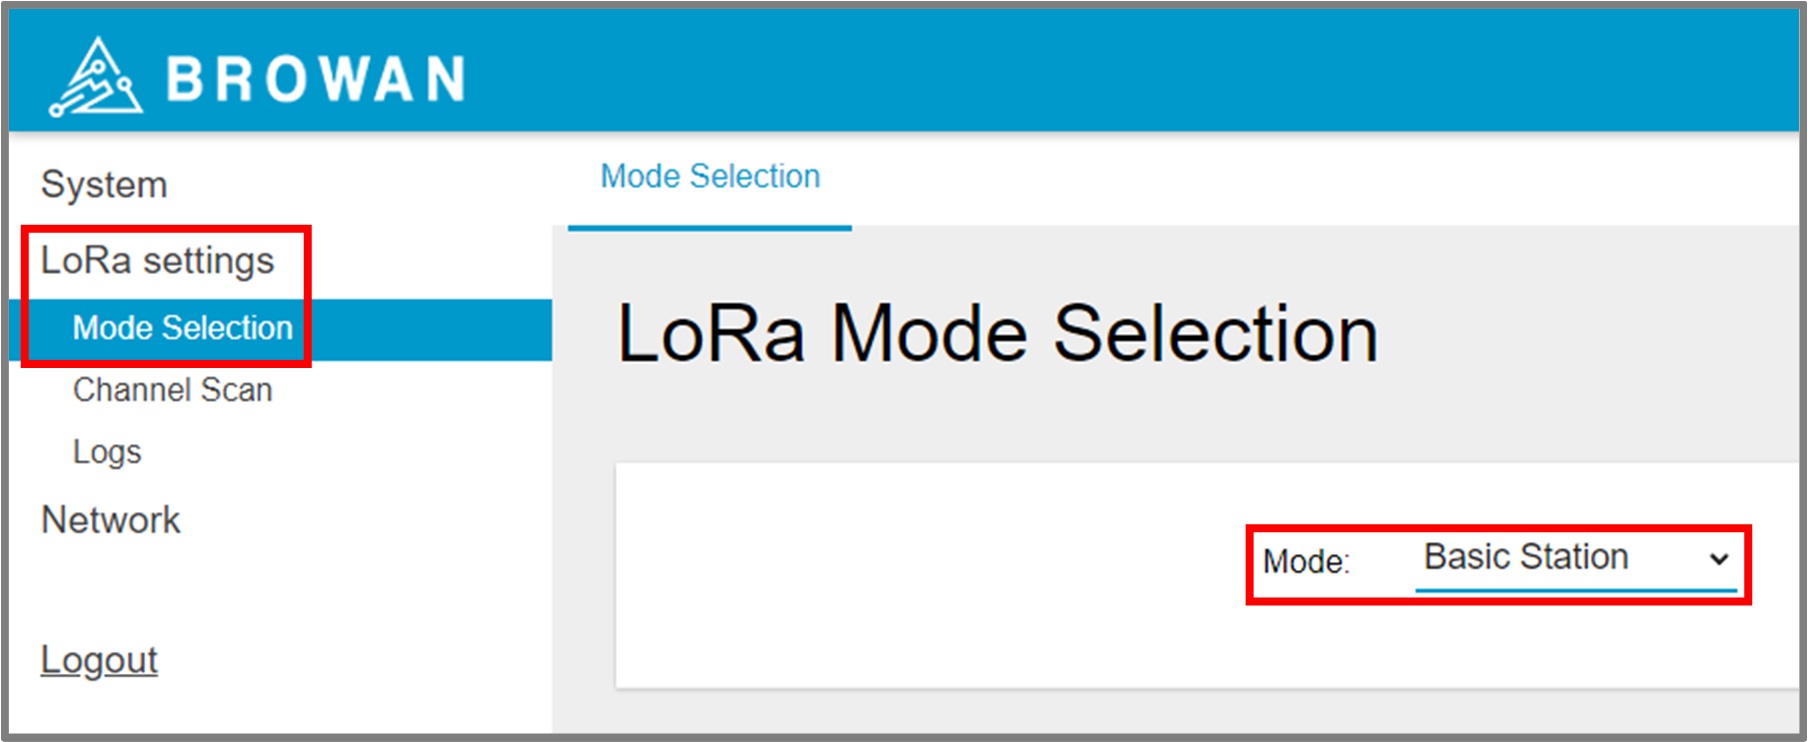
- To configure the Semtech Basic Station packet forwarding software, navigate to:
LoRa settings > Mode Selection. - Select
Basic Stationfrom the Mode drop down menu and click Apply.
Netmore LNS URI
The Netmore LNS protocol can be configured in two different ways: 1. Secured (Recommended) 2. Unsecured (Debugging and development purposes)
Note
Additional information regarding Basic Station can be found at the following link: Generic Semtech Basic Station
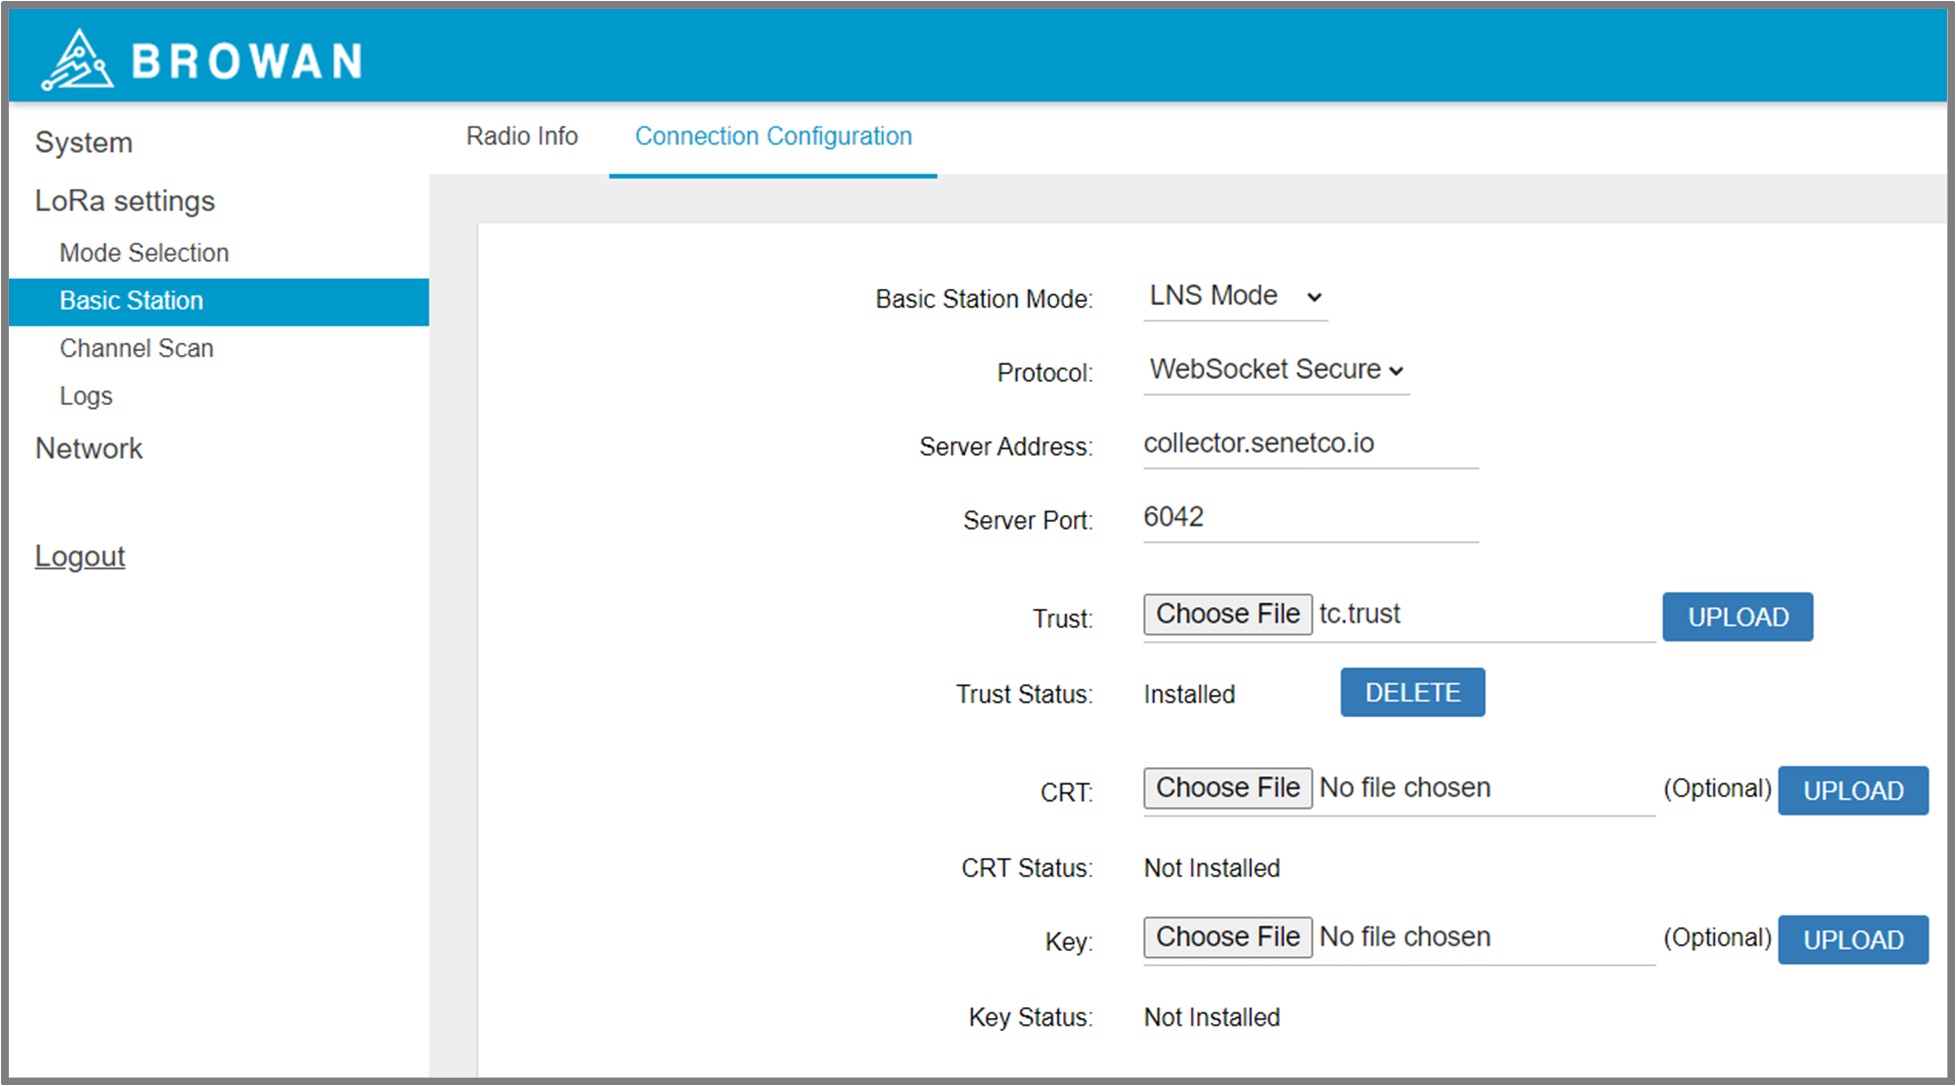
Secured LNS URI (Recommended)
- A new tab will appear under
LoRa settingslabeled:Basic Station, navigate to theConnection Configurationsection. - Select
LNS Modeas the Basic Station Mode. - Select
Websocket Secureas the Protocol. - Enter
ns-gw.lns.netmoregroup.comas the Server Address. - Enter
6042as the Server Port. - A copy of the Netmore Server Certificate (must be named tc.trust) can be downloaded directly from: Netmore TLS Server Certificate
- Ensure the filename of the Netmore Server Certificate is
tc.trust. - Next to the Trust file upload box, select the tc.trust file and then click
UPLOAD. The Trust Status will be updated toInstalled. CRTandKeyfiles are not required.- Click
APPLYbutton. - Click
RESTART SERVICEbutton.
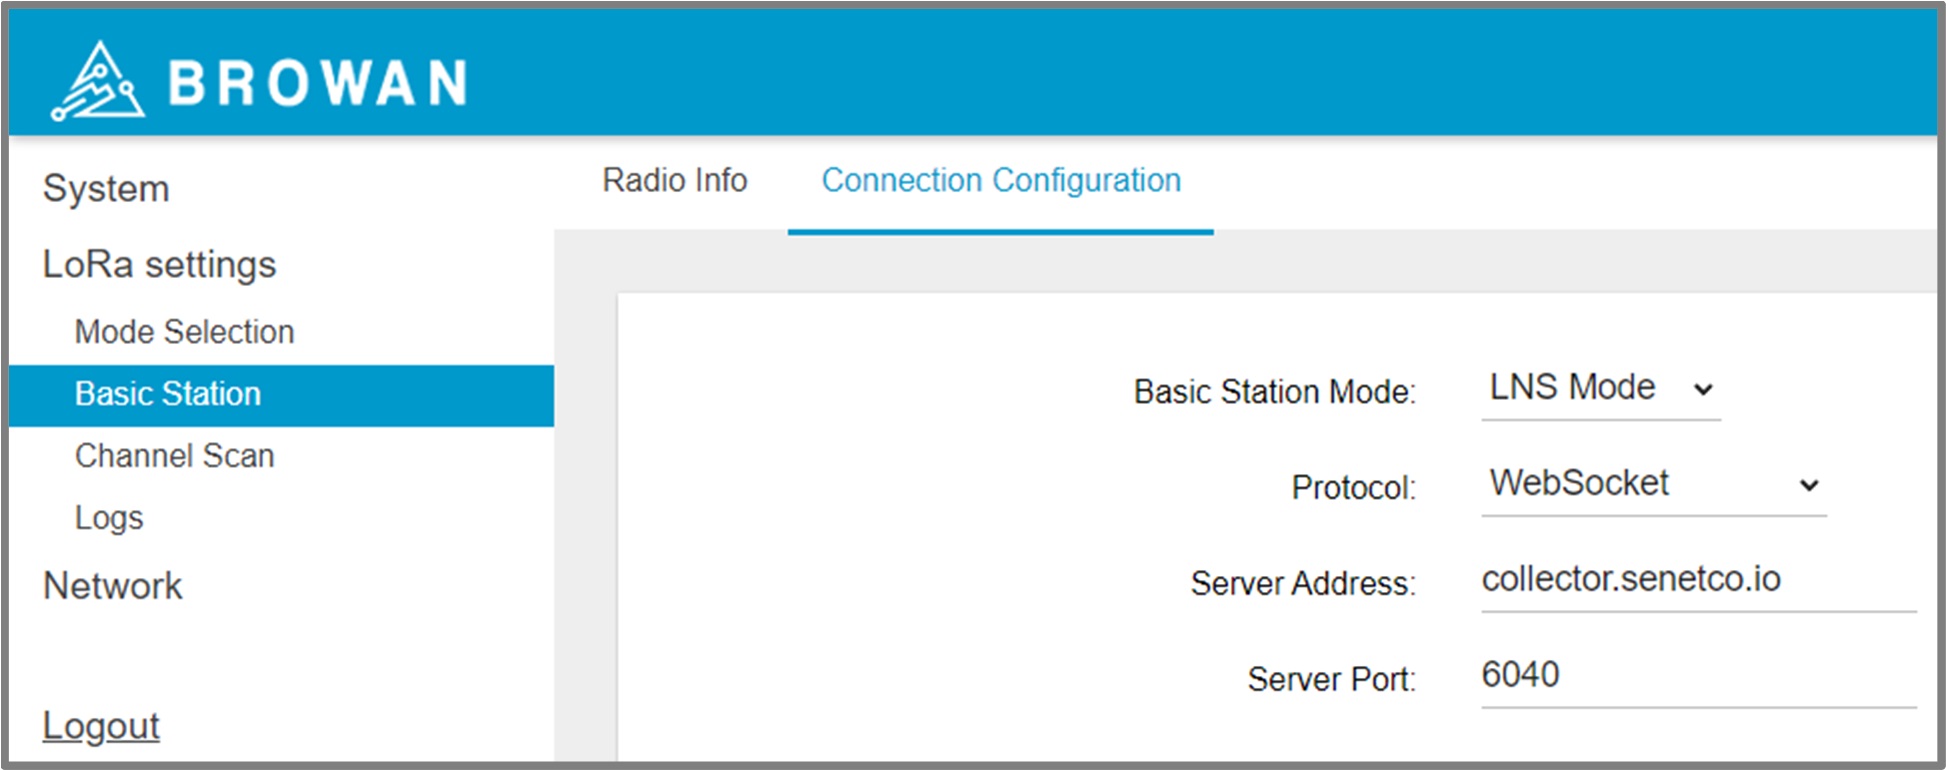
Unsecured LNS URI
- A new tab will appear under
LoRa settingslabeled:Basic Station, navigate to theConnection Configurationsection: - Select
LNS Modeas the Basic Station Mode. - Select
Websocketas the Protocol. - Enter
ns-gw.lns.netmoregroup.comas the Server Address. - Enter
6040as the Server Port. - Click
APPLYbutton. - Click
RESTART SERVICEbutton.
Verifying Connection to the Netmore Network
Upon successful completion, the Gateway status will update to Registered - Active when viewed within the Netmore Portal, and the status indicator light will turn green.