Developer Documentation
IoT development for the Netmore Network
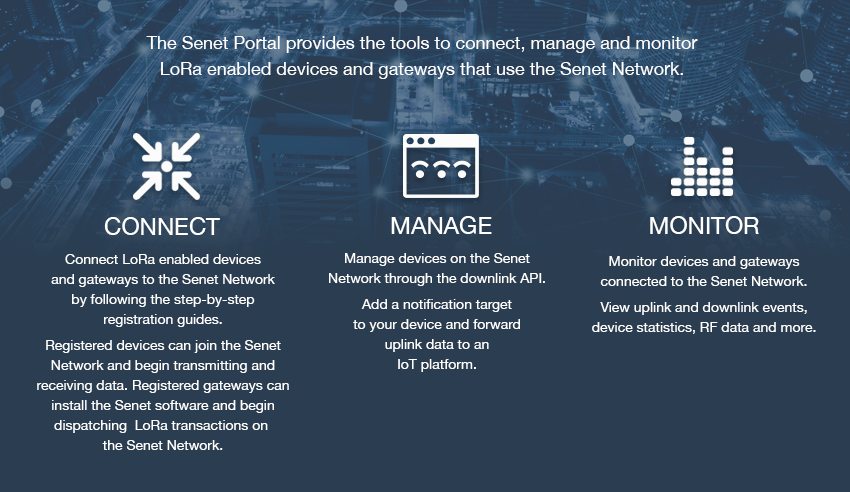
The Netmore Portal provides the tools to connect, manage, and monitor LoRa enabled devices and gateways that use the Netmore Network.
-
CONNECT
Connect LoRa enabled devices and gateways to the Netmore Network by following the step-by-step registration guides.
Registered devices can join the Netmore Network and begin transmitting and receiving data.
Registered gateways can install the Netmore software and begin dispatching LoRa transactions on the Netmore Network.
-
MANAGE
Manage devices on the Netmore Network through the downlink API.
Add a notification target to your device and forward uplink data to an IoT platform.
-
MONITOR
Monitor devices and gateways connected to the Netmore Network.
View uplink and downlink events, device statistics, RF data and more.
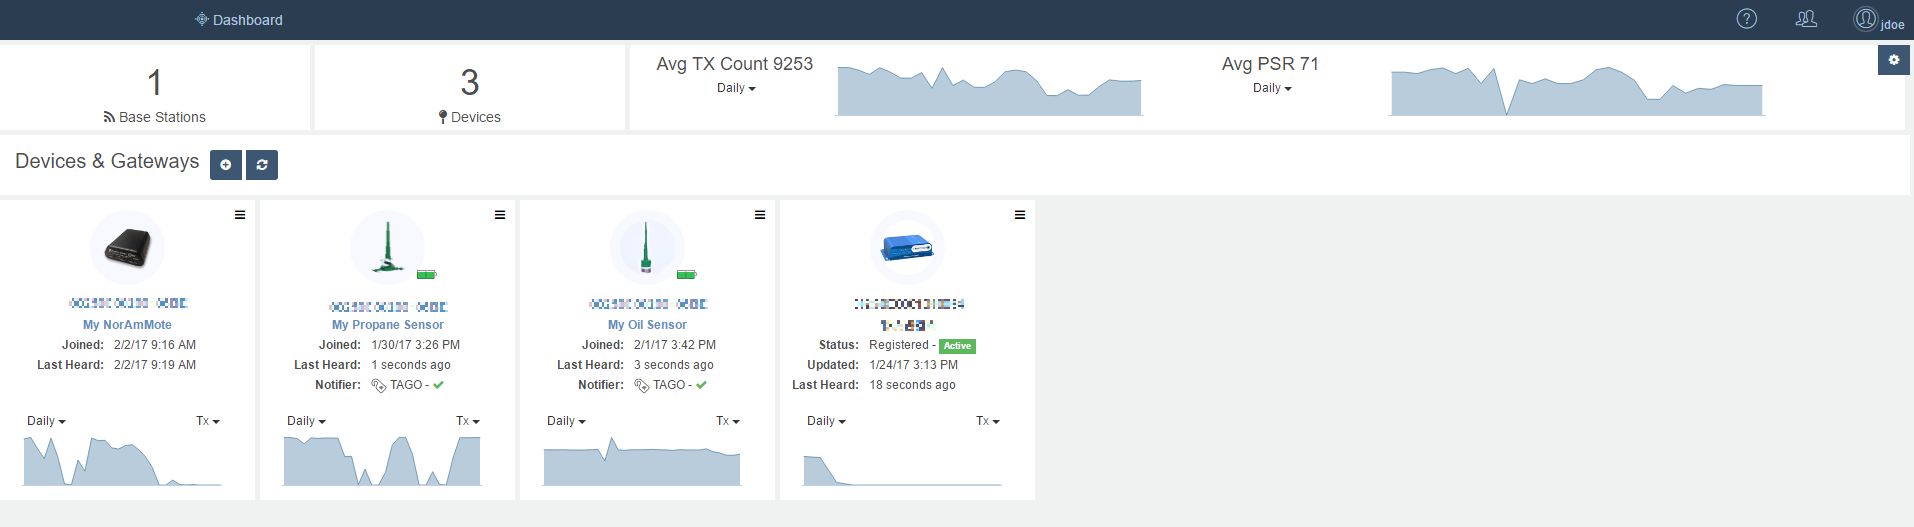
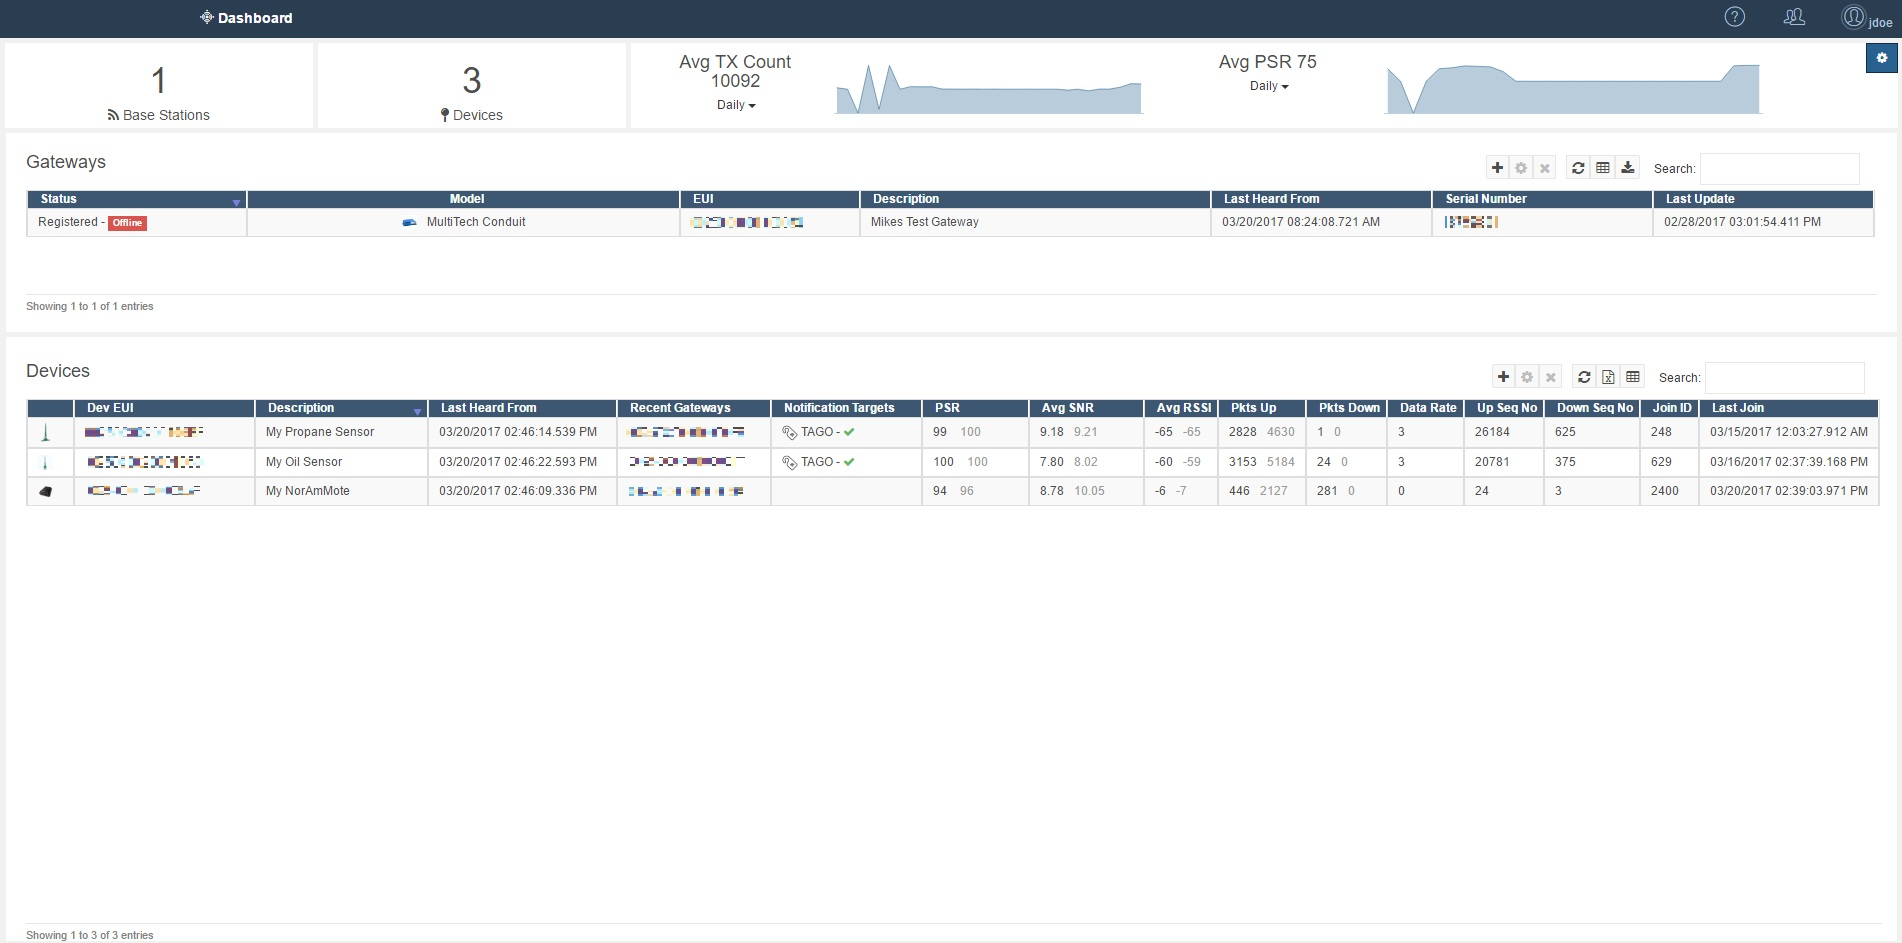
Dashboard
The Dashboard is the main view of the Portal. Users can connect their Devices and Gateways to the Netmore Network through a simple registration process. The Dashboard displays high level statistics and RF data to help users monitor their equipment.
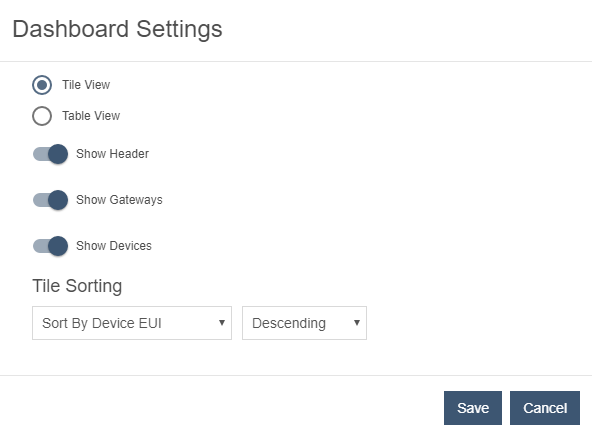
Customize the Dashboard
Click on the gear  in the top-right corner.
Options are displayed to choose a view and toggle Dashboard features.
Note
When the Tile View is selected, the Tile Sorting options are displayed at the bottom of the Dashboard Settings. When the Table View is selected, rows can be sorted by clicking on the column headers.
Tile View
Choose the Tile View in the Dashboard Settings to display each Devices or Gateways in a tile. The tiles show network and configuration data along with a graph to display transaction and RF statistics.
Register a Device or Gateway
Click on the plus icon  above the tiles to open the registration window shown below.
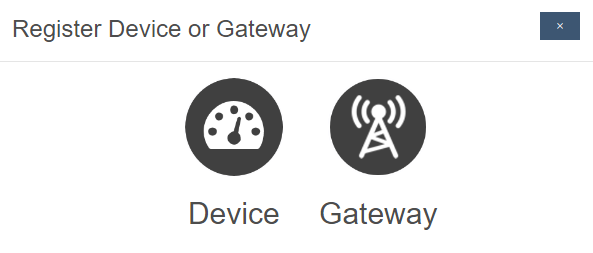
Click on the Device image to register a Device or the Gateway image to register a Gateway. See the Device Registration documentation or Gateway Registration documentation for step-by-step instructions.
Edit or Delete a Device or Gateway
Click on the menu button  in the top right corner of the tile. Click on the delete button
  to remove the Device or Gateway. Click on the edit button
  to open the Edit Device or Edit Gateway window.
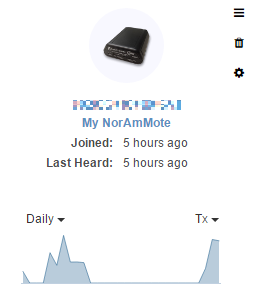
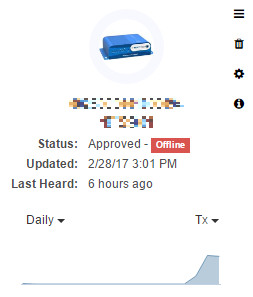
Table View
Choose the Table View in the Dashboard Settings to display the Devices and Gateways in separate tables.
Register a Device or Gateway
Click on the register button  above the Device or Gateway table to open the respective registration window. See the Device Registration documentation or the Gateway Registration documentation for step-by-step instructions.
Edit or Delete a Device or Gateway
Click on a row to select a Device or Gateway. Click on the delete button  to remove the selected item. Click on the edit button
  to open the Edit Device or Edit Gateway window.
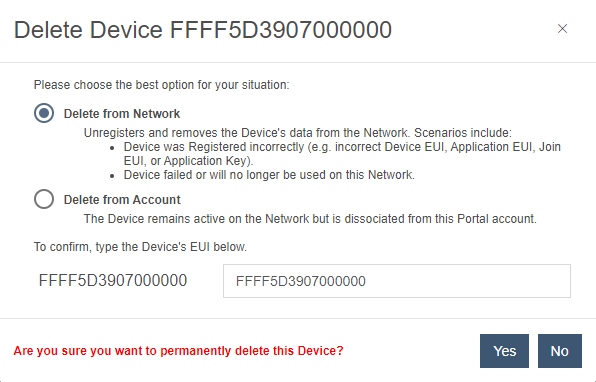
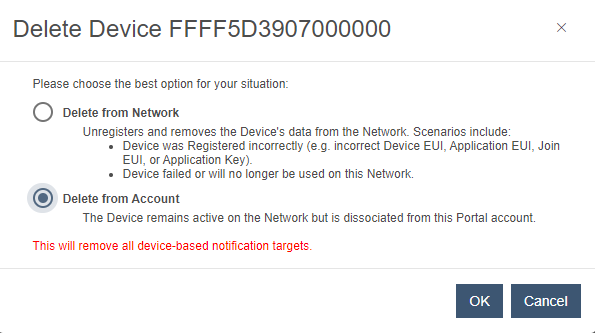
Deleting a Device
There are two options provided for deleting a Device:
- Delete the Device from the Network.
- Delete the Device from the Account only.
Deleting the Device from the Network removes the Device from the NMS completely. It will not be able to communicate on the Netmore Network following the deletion.
Deleting the Device from the Account leaves the Device in an active state on the Network, but removes it from display in the Developer view. Deleting a Device from an Account also removes any Device specific Notification Targets. Data from the Device will not be forwarded until it is associated with a new Account and Notification Target.
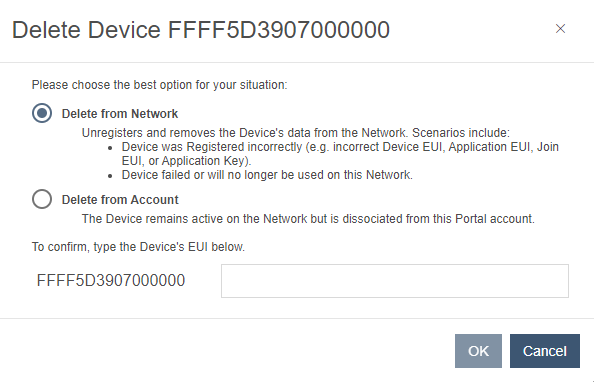
Network Delete
Account Delete
Device Details
Click on a Device EUI or Device image in the dashboard to open the Device Details view.
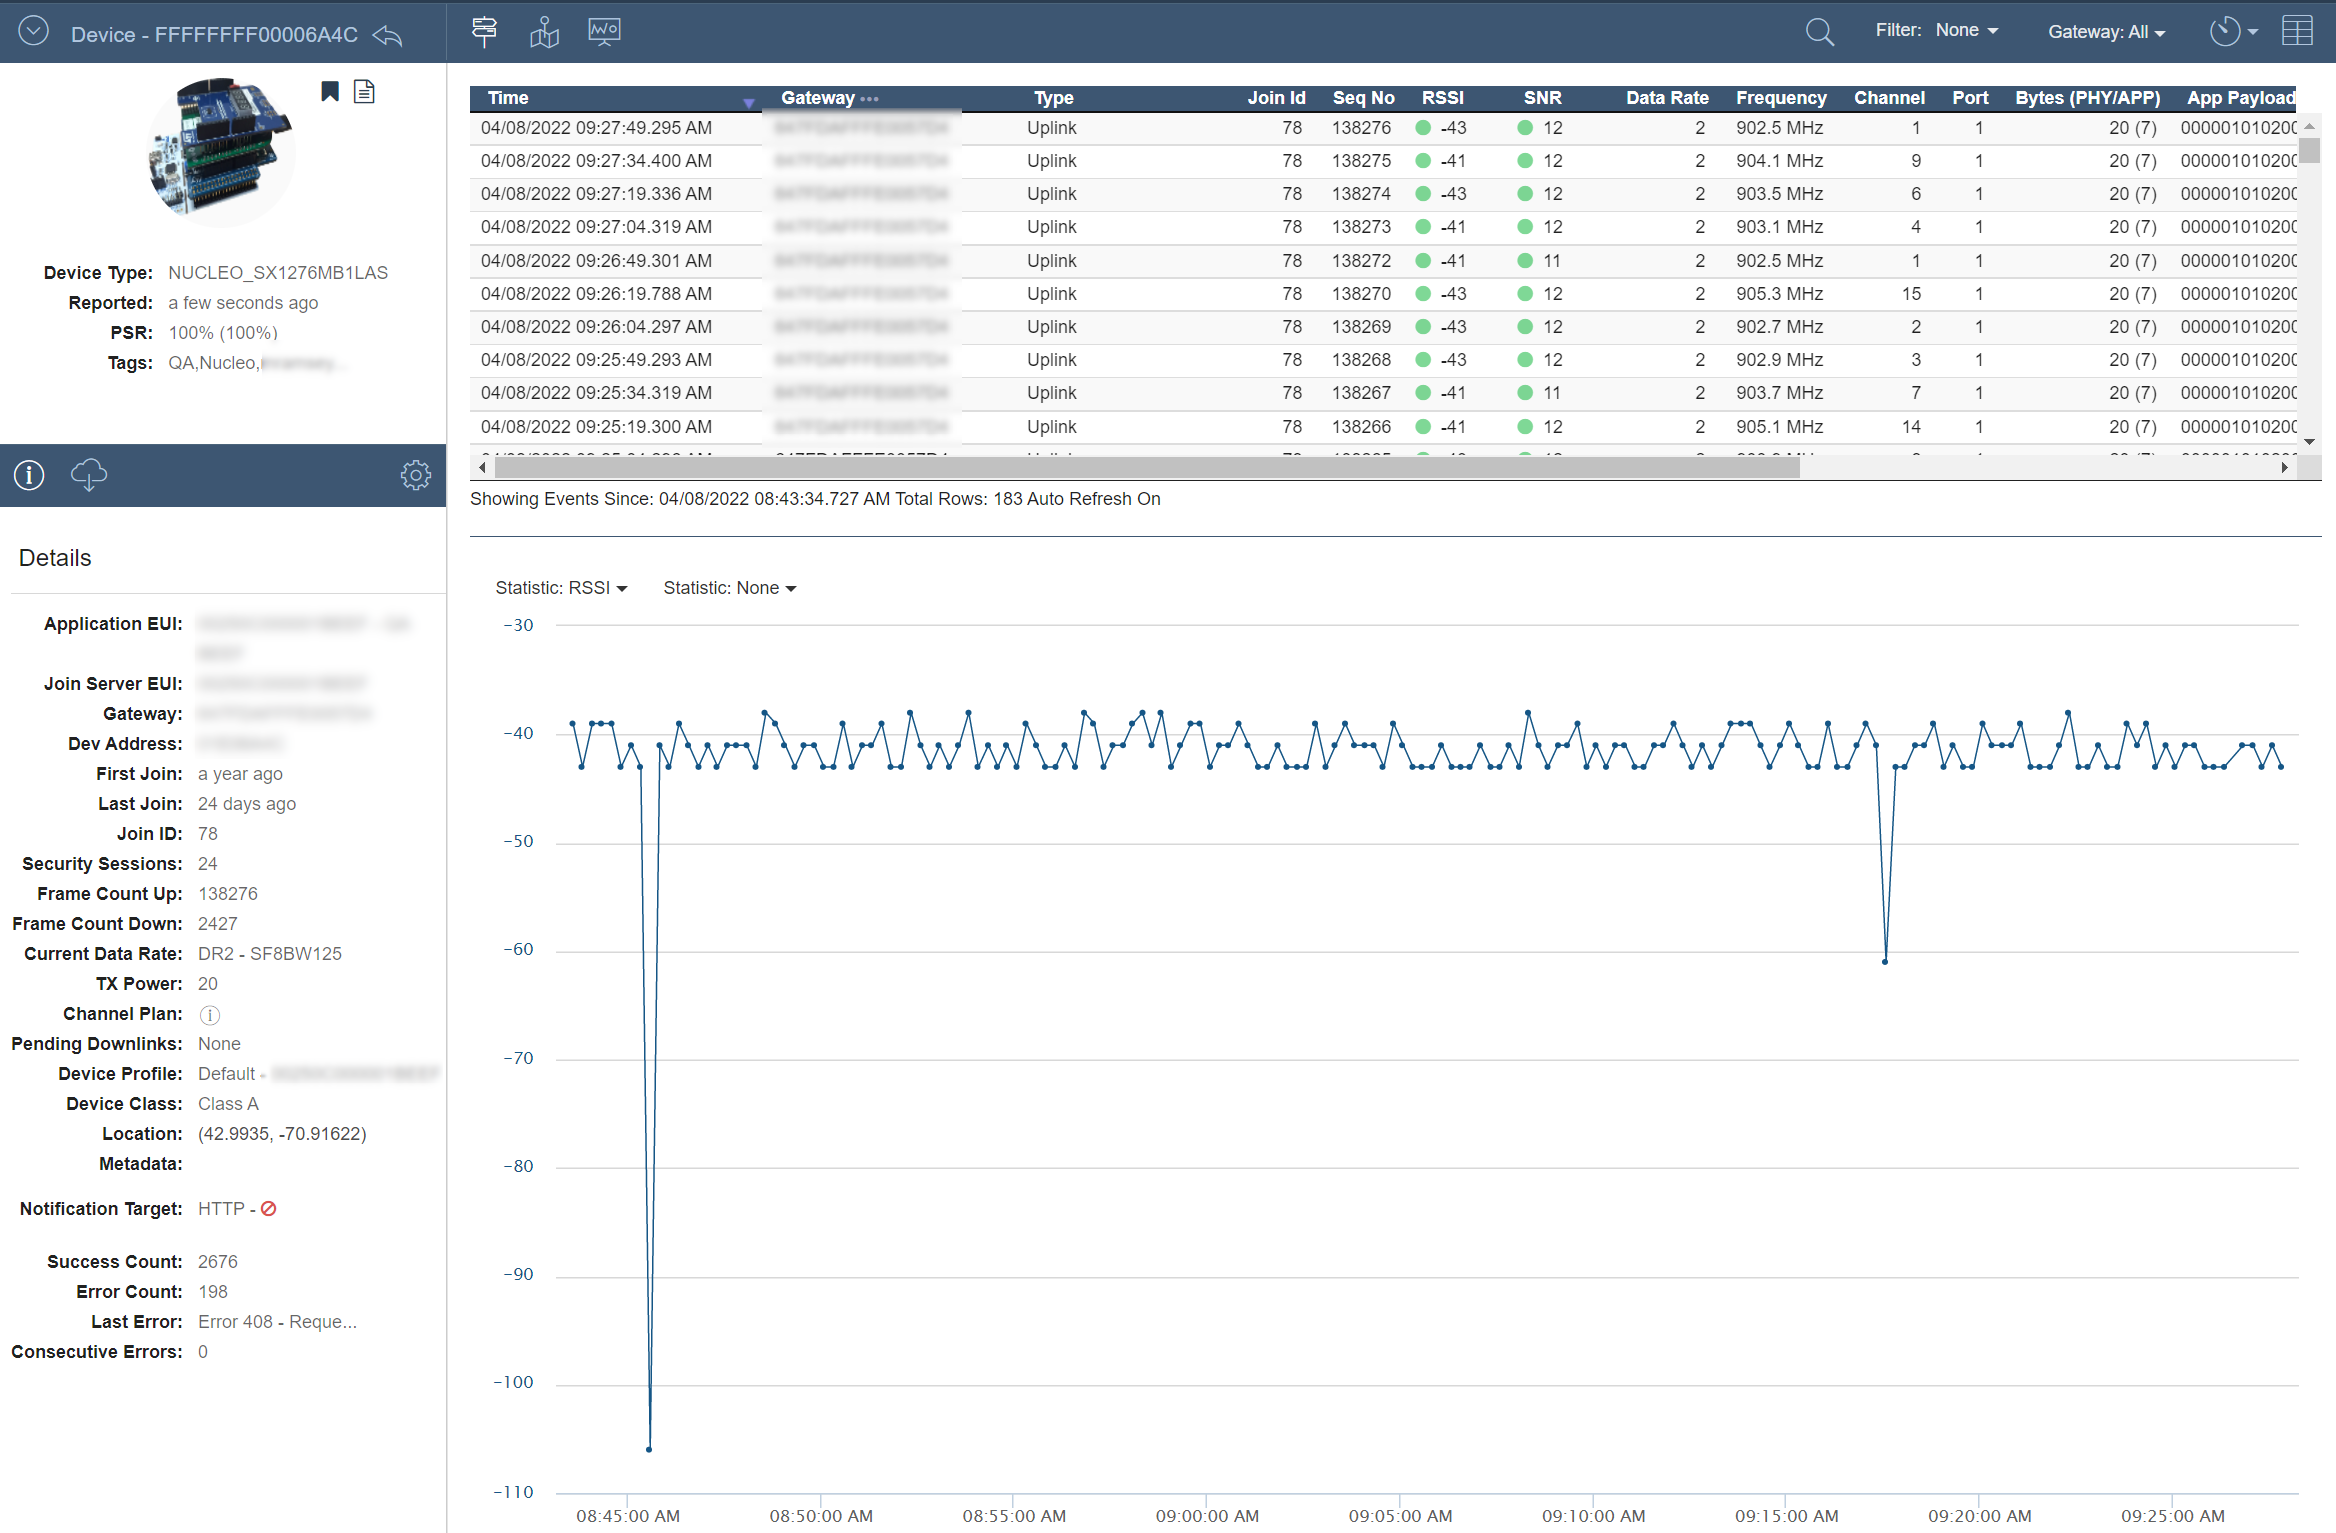
Details Panel
The Details Panel on the left side of the image above allows users to edit their Device, send downlinks and view Device information and statistics. Click on the  button to minimize.
 Details: Display current information about the Device
 Send Downlink: Send downlink PDUs to the Device
 Edit Device: Open the Edit Device window
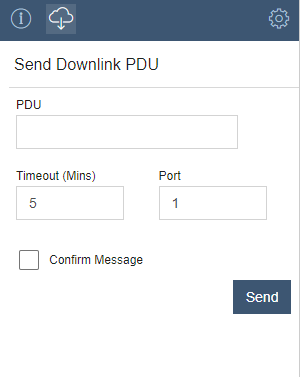
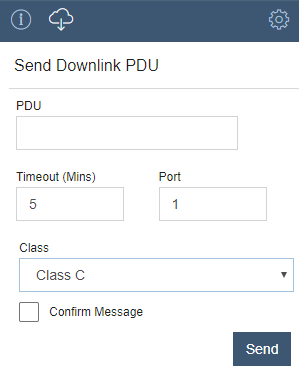
Send Downlink
On-demand application downlinks can be sent directly from the Device Details view. A message is sent by specifying the message PDU and the target port on the Device. Message confirmation is enabled by checking the corresponding checkbox.
When operating as Class-B or Class-C, the Device's Details Send Downlink UI will display a Device Class selector.
Downlink options include:
- Class-A: Queue the downlink until the next uplink receive windows are available
- Class-B: Do not queue; send the downlink to the elected base station for transmit on the available next ping slot
- Class-C: Do not queue; transmit immediately.
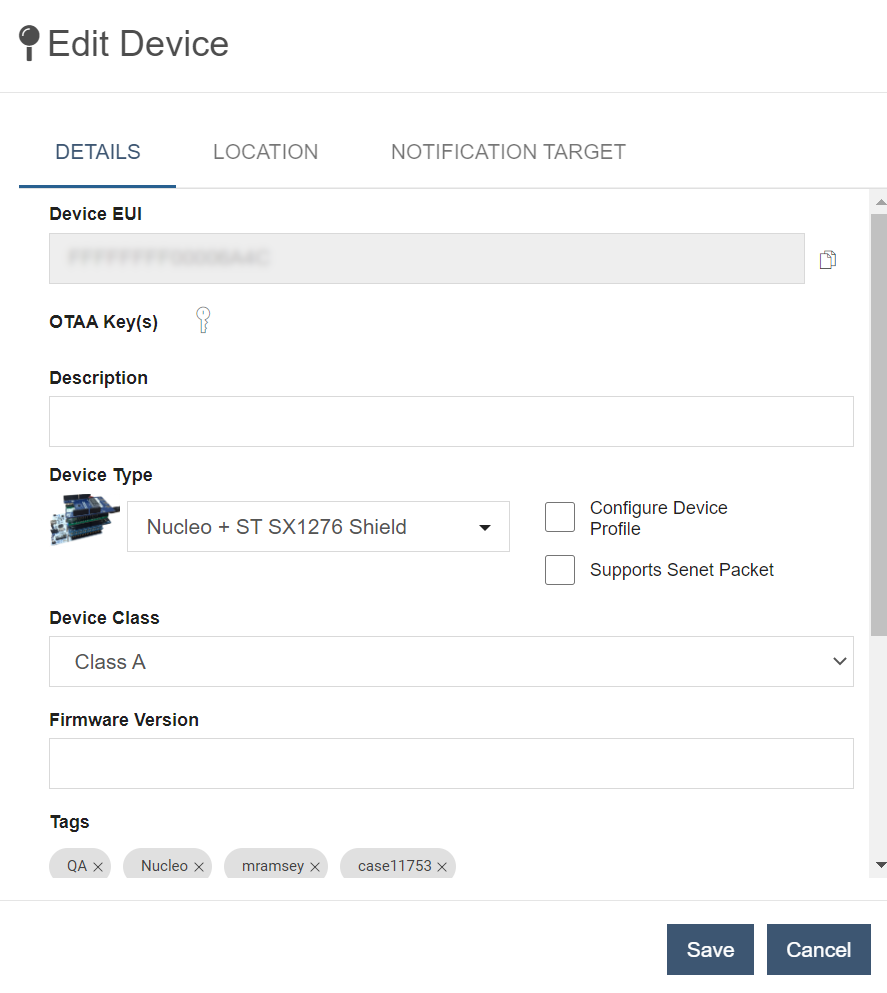
Edit Device
Edit the Device description, type and notes in the DETAILS tab.
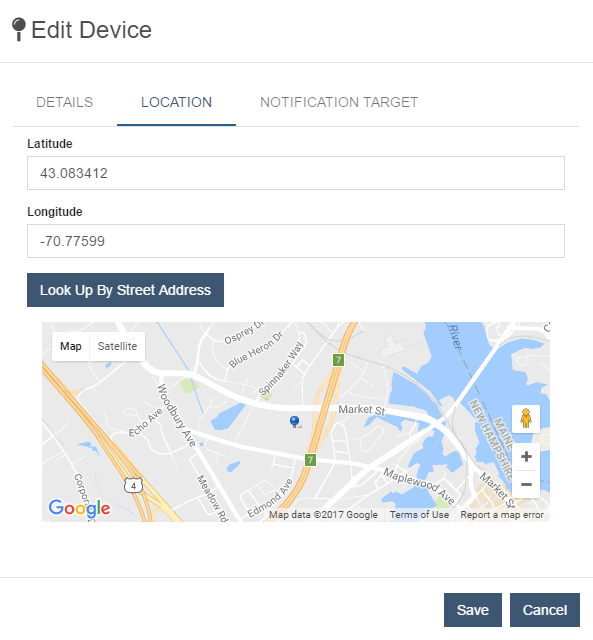
Edit the Device latitude and longitude in the LOCATION tab.
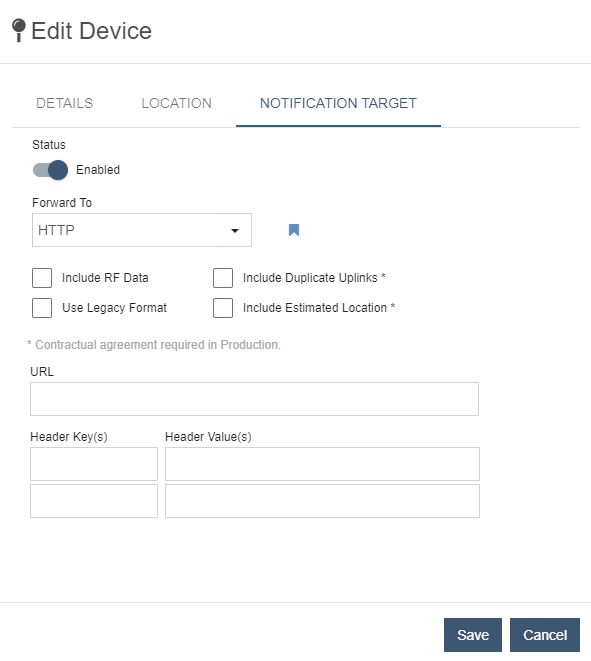
Edit the Notification Target in the NOTIFICATION TARGET tab.
Select LoRaWAN Device settings can be overriden in the DEVICE PROFILE tab. These configure the behavior of the Device on the network and do not normally need to be changed. Accordingly, this tab is not visible by default. Check the Device Profile checkbox on the DETAILS tab to display this tab.
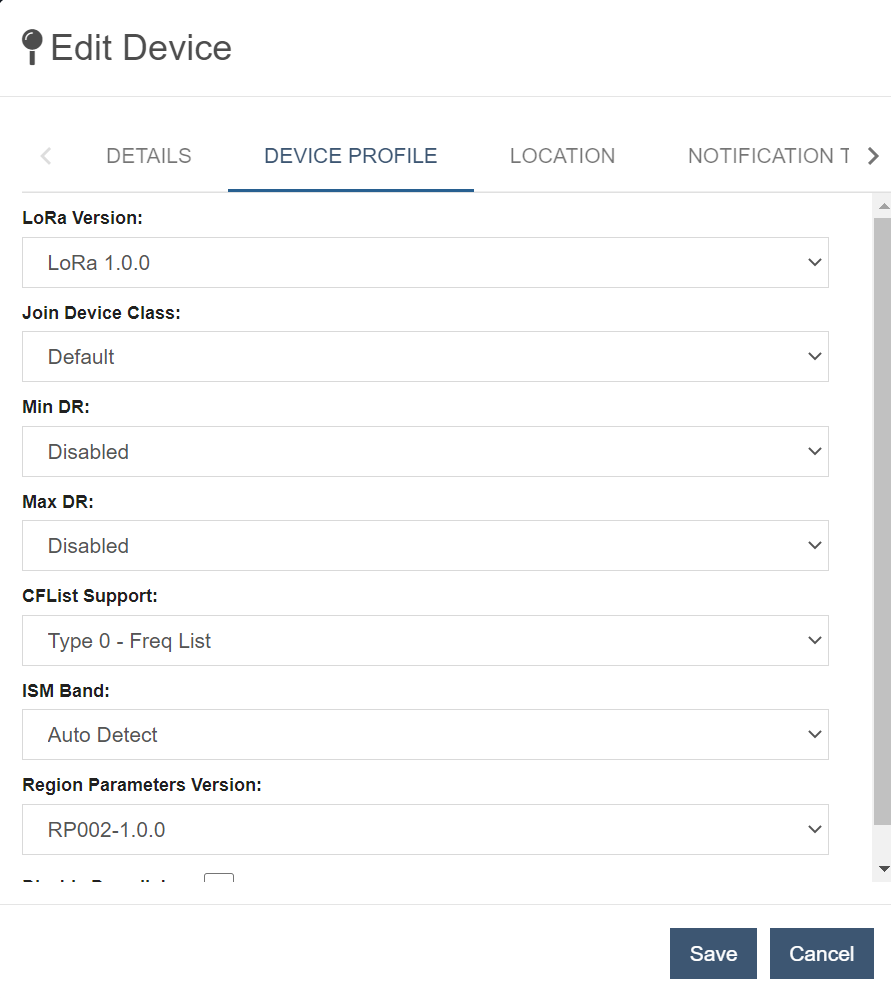
The following table contains the list of LoRaWAN settings that can be set in this tab:
| Field | Description |
|---|---|
| LoRa Version | The version of the LoRaWAN stack that the Device supports. |
| Join Device Class | The LoRaWAN Device class that the Device is after joining the network for OTAA Devices, or when it first uplinks the first time for ABP Devices. Default is Class A for LoRaWAN currently. The other options are Class B and Class C. |
| Min DR | The minimum data rate the network server is allowed to command the Device to use. |
| Max DR | The maximum data rate the network server is allowed to command the Device to use. |
| CFList Support | This option identifies the type of CFList allowed for use. The CFList is provisioned only when supported by the region the device is operating in. If Type 0 is selected, the CFList will be used for regions implementing dynamic channel plans (EU868, AS923, IN865, CN779, EU433, KR920 and RU864). The Type 1 CFList is only supported for regions implementing fixed channel plans (US915 and AU915). |
| ISM Band | This is used for regions where a Device might be heard on multiple bands. When set, the Network Server will only process uplinks on the designated band to ensure optimal ADR configuration. |
| Region | The LoRaWAN radio frequency region - as defined in the LoRaWAN Regional Parameters Specification - where the Device will be operating. |
| Region Parameters Version | Identifies the version of the LoRaWAN Regional Parameters specification that the Device operates in compliance with, according to its regional location. |
| Disable Downlinks | This flag will stop the network server from ever sending a downlink to the Device. This is mainly used for testing how a Device will behave if you starve it of downlinks. |
Gateway Details
Click on a Gateway EUI or Gateway image in the Dashboard to open the Gateway Details view.
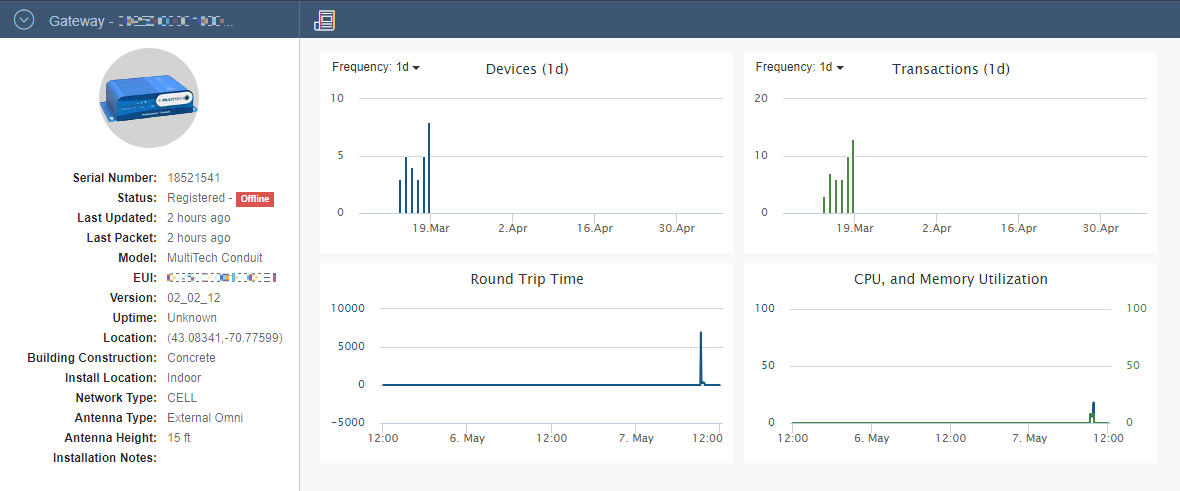
Details Panel
The Details Panel on the left side of the image above displays information and statistics about the Gateway. Click on the button to minimize.
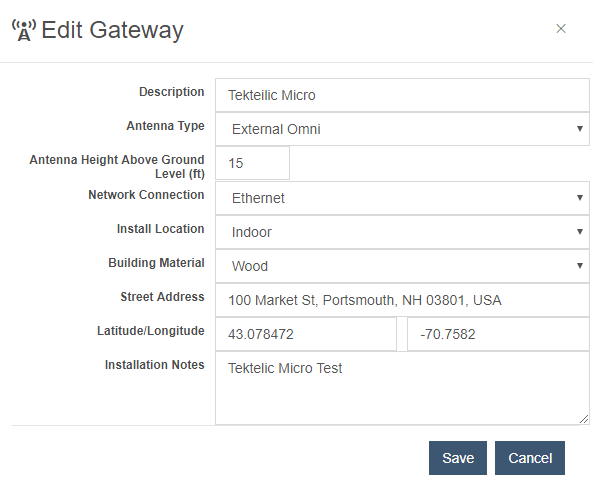
Edit Gateway
Edit the Gateway installation information.
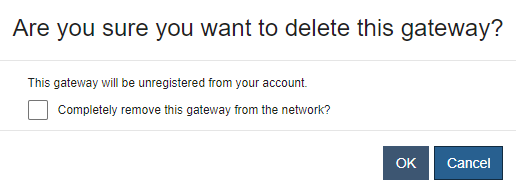
Delete Gateway
Click the button in the table view or the button in the tile view to remove the Gateway. A dialog is shown to confirm the delete request. The dialog includes a checkbox to indicate that the Gateway should also be permanently removed from the network. If the box is not checked, only the user's association to the Gateway is removed.